Wednesday, August 29, 2012

Super Easy Warm Potato Salad

I'm sure there are lots of ways to make your own potato salad from scratch, but when you've got minimal ingredients or you realise you need to whip something up in 20 minutes there are a lot of short cuts you can take too.

For a yummy warm potato salad all you need is:

- potatoes - chopped into bite size pieces (peeled or unpeeled - it's up to how you like it)
- coleslaw dressing - I use Kraft brand
- a squeeze of lemon juice
- a splash of Italian salad dressing
- a smidge of mustard - I used the yellow American stuff because that's what I had. Could use just about any.
- salt and pepper

Basically you cook the potatoes until they are tender, drain and set aside until they've cooled from hot to warm. Add the coleslaw dressing gradually, until the potatoes are coated but not drenched in it. The add a little splash each of the lemon juice, salad dressing and mustard. I add only a little to start, then taste and see if I need more of anything - as they say, adding more is much easier than taking it out again if you add too much. Season with salt and pepper.

Served warm is best I think, but is great cold too.

Extras:
You can add other ingredients too, if you like - e.g.

- hard boiled eggs, chopped
- spring onion or red onion
- peas or corn
- chopped dill


Substitutions:
- don't have coleslaw dressing? You can use mayonnaise and a smidge of vinegar.
- don't have Italian salad dressing? Other dressings might work, or if you have none at all, then a little olive oil & vinegar combined with the lemon juice and S&P you're already adding should do the trick. Add a tiny bit of caster sugar if it tastes too sour or tart.
- no mustard? It can do without it, just make sure you season well with the other stuff.

If you make this, have made something similar before, or do some other variations I'd love to hear about them!


Tuesday, August 28, 2012

Homemade Gifts for Men

homemade gifts for men


Gifts for women are easy. Whether homemade or bought, I find it way easier to find cute and suitable gifts for the girls.

Men are not so easy, especially when it comes to handmade. They aren't as sentimental, don't often go in for the 'handmade' look, want to seem cool or professional, and 'cute' isn't probably in their valued gift vocabulary.

I think sometimes gift giving from women to men ends up being far more fun for the woman than for the man. I can find heaps of things I think would be cool to give my husband, but I know I'd definitely be more excited about it than him.

For gift giving to men there are a few things to think about - their interests - i.e. sport, beer...umm, meat?... their profession and work place... their level of metro-ness....

Men that fall into specific categories can be easier. Like if my husband was more metro, I'd make him some manly skin care. But unfortunately, rarely do men actually fit a convenient stereotype.

My husband is difficult when it comes to finding creative homemade gifts, ironically because he has simple tastes. He doesn't really drink alcohol or coffee, he's not into cars, he's not that into gadgets, he isn't into fashion, he doesn't wear ties or cuff links... that rules out most of the typical mens gifts.  I'm sure the men and boys in your life have their own list of difficulties too.

What he does like: Sports; board games, card games and crosswords; he's proud of his garden and the things he has built himself; And his children - while the first one is still only on the way, I feel confident in saying he'll like his children once they arrive ;)

Something hints to me that since he's a simple soul, I should quit trying so hard and go with simple gifts. That the creative homemade gift track is more about me, than him.... hmmm.

Still I'm going to press on...;) there's got to be something!

So here's my short round up of non-cutsie, not-too-homemade-looking homemade gift ideas for tricky men.

picture frame dad picture frame
1. For the Dads: Photos of the kids in simple frames. This should be low on the embarrassment factor even for his desk in the workplace. As far as I know photos of family is acceptable even for manly men. I like the scrabble tile words and the baby holding the letters, subtly appealing to his sentimental side - we know it's in there - without being 'smooshy'. 

gift for dad
He doesn't have a workplace/office/desk? Maybe a little mini-album for his wallet - 'scrapbook style', creatived up, but without too many embellishments. You could do it on the computer, and add simple frames and words to the photos and then print them out wallet size, or as a book mark, or maybe as a magnet for the beer fridge... or is that pushing it?

***

gifts for men


2. For any guy: Home sewn caddies and toiletries bags. You could use the same patterns and tutorials for these sorts of things that you see everywhere for women, just in more manly designs. Make it a toiletries pack, shaver bag, first aid kit for the car, mini-tool kit for the car etc.

***


Homemade golf club head cover


3. For the sporty types: If he has a particular team he loves and you can knit or sew, then maybe beanies, hats or scarves in team colours will work, but that can be a dodgy route unless it made by the kids. I find more often guys who like sports teams want jerseys and things with their favourite players number and things like that, not homemade.

If he's a gym junkie or plays team sports, a sports bag could be homemade if you can sew - somewhere to carry his gear and shoes etc. Make it tough, simple and streamlined. No fussy bits.

Golf club head covers are another idea, and the one pictured above looks professional enough to work. I'm pocketing that idea.


***

BBQ gifts for men


4. For the BBQ-er. And what man doesn't consider himself one? These BBQ towels are pretty good. I can just picture how grubby they would be after one single use, though so I'd probably make them in less pretty colours. Think black, grey, maybe red. 

If he wears an apron, then one with pockets and hanging bits for the utensils would work, but I don't actually think I've ever seen a man BBQ in an apron. So I'm thinking a hanging caddy that attaches to the BBQ itself and can hold utensils, oil, paper towel, spices etc, freeing up the often limited bench space.

***


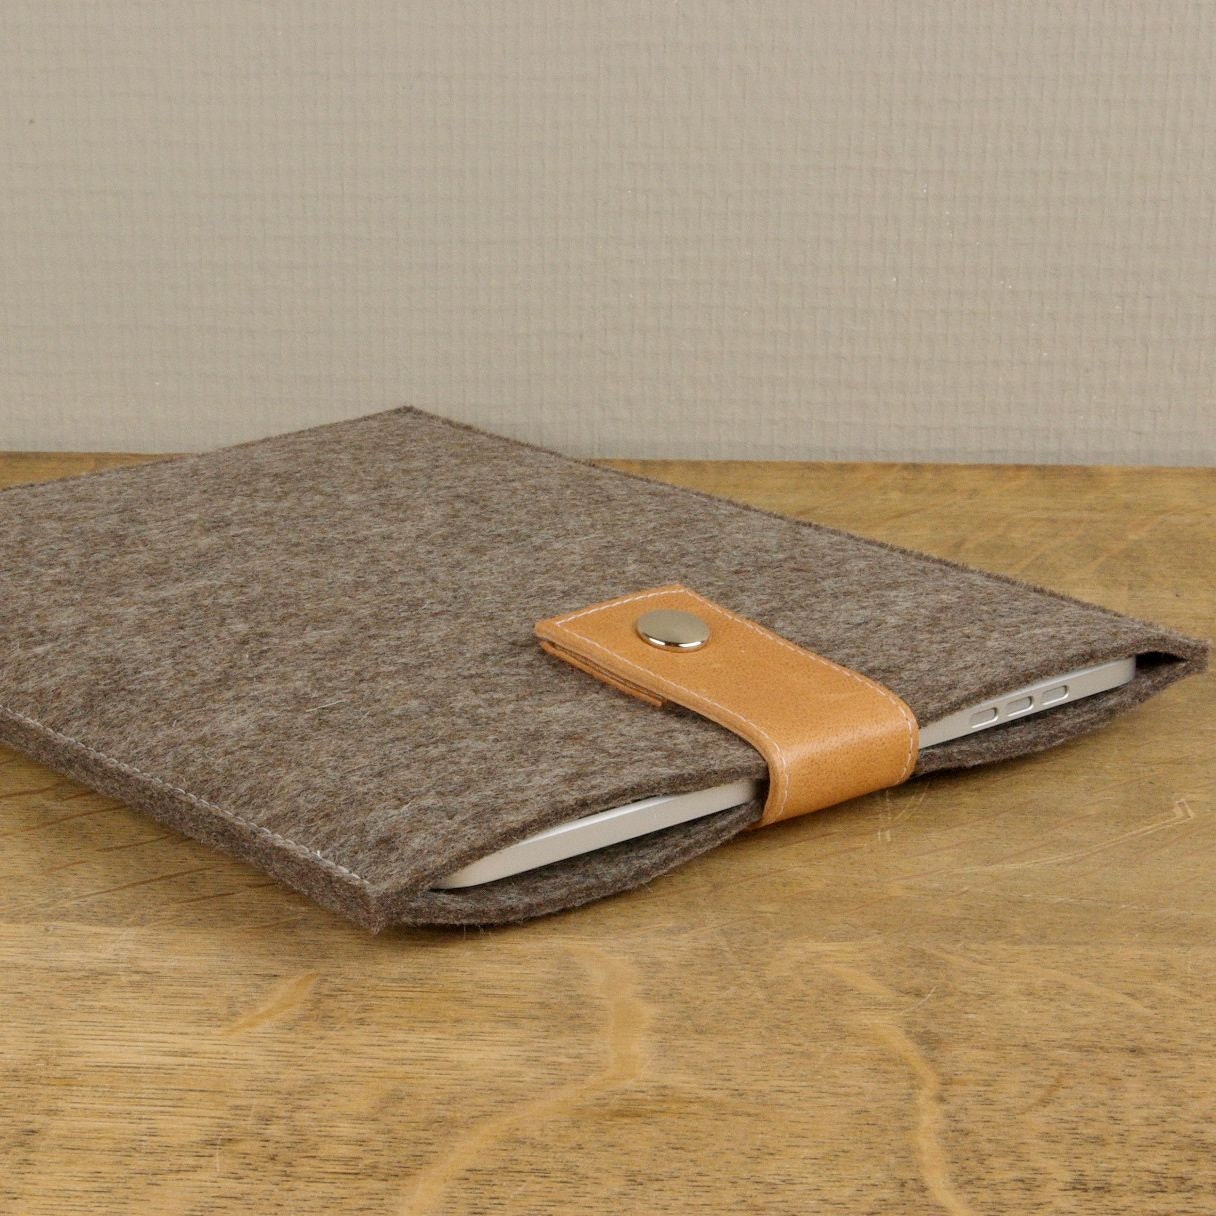
5. For the techy-types. Covers and bags for iPads, phones and laptops can be winners, but it can be hard to find designs that really suit men, and won't receive funny looks from the other guys he works with. Go for denim, cord, leather, canvas etc in manly colours to be safe and keep the design itself simple and fuss free.

comics ipad cover
You can be more creative based on his interests, if you know he likes that sort of thing, like this comic book themed iPad cover I saw on etsy. 


***


6. For the 'stuff' guy, friend or co-worker. If he does like cool bits and pieces - or you need a small gift for a co-worker or secret santa - then there are plenty of little ideas. Personalise a jar for his loose change, or a container for his keys and wallet. Personalise a coffee mug with ceramic paint pens.

I saw this little gadget for sale on a website of cool things - not homemade, but you might be able to DIY it somehow. It's an octopus shower caddy. I actually think this could be a good gift, but really I still can't separate "I would love that" from "he would love that" sometimes. So maybe this one's just for me or for kids...


***

gift coupon printable
Click above coupon to download free printables


7. For the 'Acts of Service Love Language' guy. If he is more of a 'do-something-for-me' than a 'give-me-something' kind of guy - in a good way of course - then maybe your home made gift could be in the form of what you do rather than what you make. 'Coupons' are not a new idea, but that's the kind of thing I'm thinking here. Make them useful though, and don't wimp out on what he really would appreciate. If you hate mowing the lawn, but know he would really love a break from that, give him that and tough it out. Plan in advance to have your neighbour/dad/friend help you if you know you'll have trouble getting it started and all that jazz.

Make a day of it - or even a week of it. If it's his birthday, rather than just making a book of coupons that will get chucked in a drawer and forgotten about - conveniently making you look thoughtful without having to follow through - come up with a list of things he'll love and just do them for him. Don't make him redeem breakfast in bed, just surprise him with it. Go out and play tennis/walk around a golf course/insert activity with him if you normally don't find the time. Clean his car for him while he's out. etc etc

***

gift bags


8. Gift Wrapping.   Now, if you do have to cave and buy something, then maybe some creative gift wrapping will satisfy the homemade urge. The gift bags above a cute, and might be good for some men. I'd also think of personalised wrapping that means something to the man you're giving it to. For example, for my husband - hope he's not reading this - I'd use the crossword pages from the newspaper in some way to wrap a present because he loves crosswords.


Fathers Day 1

9. Not handy? Don't feel like you'll be able to successfully hand make something yourself - or at least not something that you wouldn't have to blame on the kids.... don't worry, sometimes our best Pinterest inspired ideas just won't happen. But there are other ways to personalise things.

Go to Zazzle and either find a creation that suits the man you're buying for, customise someone else's design, or create your own. Since it's all on the computer you can just delete and start again if it doesn't turn out! You can add your own pictures and text to aprons, mugs, phone covers and so much more.


***


The bottom line is, think about his interests and personality;
make him something he would like, not just something you would like to make.


Got any homemade gift ideas for men you're thinking of or have made before? Would love to hear about them or see links to them on your blog! 

Tuesday, August 21, 2012

Tip for painting drawer pulls and knobs

Rather than trying to hold the knob with your fingers and paint at the same time, use the screw that will fit the knob to the door or drawer. Screw it in a little and use it as a handle to hold on to.


Then to let the paint dry, leave the screw in and sit the knob on the edge of something. I used the inside ledge of a chest of drawers I was painting at the same time, but you can use any flat edge. Even though you don't paint the flat underside of the knob - since you don't see that anyway - paint might have still lipped the edges, so either protect your surface or put them somewhere a few paint spots won't matter.


Friday, August 17, 2012

Tissue Holders

I made a few of these the other day for little gifts - I was going to make some more coasters, but realised I wouldn't have time so I was looking for something quick to whip up and these definitely fit the bill. 

I looked at this tutorial, and this one,  to get the basic idea and the right size and everything but came up with my own design in the different fabric prints. There are plenty of tutorials out there for inspiration.


These are pretty straightforward and easy, though they took a bit longer than the 10 minutes stated in the tutorial, mainly because of the cutting out and sewing together of different panels of fabric, topstitching and pressing them before sewing into the pocket. If you were just using one fabric it would be a lot quicker.

One tip I would have if you are joining strips of different prints, since I made this mistake, is to think about which way you join the fabric. When you sew the pocket together, the two short ends fold in to meet in the middle. Depending on how you joined your fabric, you will either get horizontal or vertical strips of colour. Fortunately mine turned out looking ok anyway, but I actually meant to for the strips to be oriented the other way! I blame the rush I was in... but honestly, this spatial weakness is always a problem for me in sewing!

An illustration if that wasn't clear - (maybe no one else needs this, but I should have thought about it more when I was doing it!)

- The short ends are folded in to meet in the middle.

  -- So if you join your fabric like the red, orange and green picture, you will get a finished holder with horizontal stripes. If you do it this way, check to see what it will look like and maybe use some thinner strips otherwise the balance of colours may not be in the right positions. Ie you might end up with only one colour visible on the bottom, when you wanted stripes.

  -- If you join your fabric like the pink, blue and purple picture, then you'll get vertical stripes in the finished holder. If you used three (or more) different prints, this is better for making sure you can see them all together.

Great little gifts and beginner sewing projects.


Saturday, August 4, 2012

How to glue fabric to wooden shapes

I bought a red wooden heart from Typo, but when I got it home I decided the red wasn't quite what I wanted. Two options - repaint in a new colour, or cover with fabric.

I had some orange fabric that I thought would be just what I wanted to I got out my trusty mod podge tub and got to work.

You'll need:

- mod podge
- paint brush
- sharp scissors
- fabric
- chalk/fabric pen to trace

1. Firstly, paint a thin, even layer of mod podge over the back of the fabric you are going to cut the shape from and let it dry. This lets you cut the fabric almost like it's paper and stops fraying.

(Make sure you press/iron the fabric first - if it's crinkled, those crinkled will become permanent glued in.

Cover you work surface with something protective - the glue can soak through the fabric a bit.)

2. Once the the glue on your fabric has dried, lay the fabric right side down. Lay your shape on that, with side that you will stick the fabric on down on the back of your fabric. E.g, if you were tracing a lower case 'e' it will look backwards to you as you trace it.

I used chalk because that'ts what I had, but it was hard to get in close to the edge of the shape, so a pen would work a lot better.

3. Carefully cut out your shape from the fabric. You want to be as precise as possible. If anything, make it bigger rather than smaller because you can always trim more off but you can't add more on. (Which I discovered...unfortunately precision isn't exactly my thing. If you do trim off too much, you can always make it even all the way around and pretend it was meant to look like that. So mine has a strip of the red paint showing around the edge.... what I always intended...  ;)


4. Paint both the surface of the shape and the back of the fabric (especially the edges so it doesn't lift) with mod podge and stick down - smooth out any wrinkles or bubbles. Because you've already painted the fabric in mod podge, though, it should go down pretty easily because the fabric will be slightly stiff.


5. Let it dry. Leave it as is, or finish with a layer of gloss mod podge if you want a glossy look. If you want it covered on both sides, repeat the process. If it's a symmetrical shape like my heart you could even do a different fabric on each side so you can change the look just by turning it around.)

6. Display!


Thursday, August 2, 2012

Tutorial: Picture frame with fabric scraps and mod podge


After sewing a whole bunch of coasters as gifts for friends recently, I had a big pile of tiny little strips of fabric from trimming my seam allowances. I was going to throw them out, but started thinking, there must be something I can do with all that fabric.


I lined all the little bits up and thought of the old picture frames I've got in a box that I haven't used yet because I don't like them the way they are, and covering the frame with the fabric strips idea was born!

Even though the fabric was all mismatched patterns and colours and probably wouldn't go together if you were making a bigger projects, the little strips all together actually looks pretty effective this way.

I used a cheap, untreated wooden frame for regular 4x6 photos and had the trimmings from making 24 coasters, so a fair little pile but didn't use it all. You could do any size frame, you'd just need to collect more trimmings.

What you'll need:

- mod podge or similar crafty glue
- fabric trimmings - save these from sewing projects where you trim your seam allowances. I tried to use a range of thicknesses - you either want to make it vary or keep them all the same width depending on the look you want.
- paint brush
- scissors (for trimming up, and small ones are easier to manoeuvre around the frame at the end.)
- a picture frame

1. Cover your work area - gluing can get messy at the best of times.

2. If your picture frame is already painted or glossy in anyway, you might want to lightly sand it to make the gluing easier.

Decide how you want to arrange your fabric strips:


Options:
- horizontal or vertical, or both, diagonal, random? ...there's no right or wrong way.
- overlap the strips so none of the frame shows through OR leave gaps. (I left the wood plain and showing through, but you could also paint it in a contrasting or blending colour before you lay the fabric.)

I chose to do it horizontal all the way around and leave gaps where the wood shows through.

2. Start gluing - paint the mod podge onto both the frame and the back fabric strip. It will stick a lot easier than just putting the glue on the frame. 


Tips:
You can either just glue the fabric the front face of the frame, or wrap it over the edges.

Do small sections or rows at a time so the glue is nice and wet and not starting to dry.

Paint a reasonable amount of glue on but make it even and don't leave any globs. The mod podge dries clear, but if it's too thick or there are globules it will not only take a long time to dry but risk being lumpy and messy.

3. Leave the frame leaning against something as it dries, checking it occasionally to push down any fabric that is lifting, or add a bit more glue if bits aren't sticking.

4. I left my strips long so I had plenty to play with and make sure I had enough to stick down. So I cut some of the excess off as I went to reuse it.
But at the end you'll be left with lots of overhanging bits. Leave these until the mod podge has dried.

5. Once the glue is dry, then you can go back and trim it up so the fabric ends are flush with frame. Small scissors will help here. You may also want to trim any loose threads from the front if any of the fabric that you used was fraying.


6. It's up to you whether you leave it as is or paint over with a finishing layer of mod podge - this may help the fabric not fray, though it probably has enough glue on it already to keep it together as long as the frame doesn't receive rough treatment.


And there you have your fabric scrap, patchwork picture frame! Pop a photo in it and display that baby!

All that's left to do is clean up those little bits of trimmed fabric...hmmm, wonder what I could make with those? ...just kidding ;)


Wednesday, August 1, 2012

How to clean a greasy oven door

I should feel embarrassed about how yucky my oven door was, but I think because I was sick as a dog with morning sickness for so long and my husband was working like a dog to support both of us (or all soon to be three of us) that things like oven doors can slide.

But I opened it today to put the grill tray back in and suddenly noticed that soon you wouldn't even be able to see through the glass window on the oven.

I've been experimenting with both Bi Carb (bicarbonate of soda, baking soda etc) and Vinegar as natural and cheap cleaning products, so I just had a feeling this was a job for Bi carb today.

So here's what I discovered to really work well:

- Open your oven door as flat as it will go.
- Lay down an old towel on the floor under the door to catch any dirty drips that happen while you're cleaning it. (I only thought of this after I saw the dirty water dripping on the floor.)
- Sprinkle bi carb over the glass
- Squeeze lemon juice over the bi carb. It will fizz up a bit. Love that :)
- Then use a bit of elbow grease. You still need to scrub a little, but it comes of pretty easily. And it smells good too, because of the lemon.

I sat a bowl of hot water next to me to rinse out the sponge periodically.


Now I'm probably slow on the uptake, and I'm sure this is nothing new, but I love discovering ways to do things and have them actually work!


Related Posts Plugin for WordPress, Blogger...